Basic concepts of RabbitMQ
After having a running message broker set up, its time to send it messages. The official learning trail on the RabbitMQ website is a good starting point. However, the code does a few things too implicit and therefore hides some important details which should be understood first.
Producers, consumers, queues, oh my!
At its heart, the messaging model of RabbitMQ revolves around message dispatching. Something sends a message, it gets processed somehow, and will be delivered to its desired destination. RabbitMQ is using several concepts around this model, namely: Connections, channels, producers, exchanges, bindings, queues, messages, routing keys and consumers. To ease things up up-front, the connection-layer is more like the TCP in HTTP and channels are short-lived transport mechanisms, so you shouldn't be too concerned about them - I will hardly address them in this blog posts at all. Let's look at the remaining building blocks of RabbitMQ:
- Exchanges Exchanges facilitate received messages to queues. You can think of them as "mailboxes" that will forward incoming messages based on a set of rules (routing keys).
- Producers (a.k.a publishers) A producer is any program that sends messages to exchanges. The message will be routed depending on its routing key (there are more options for routing, but more about that later).
- Routing keys These are the "rules" by which messages are routed. They are simple strings, and complex routing patterns are made up of IP-address-like namespaces with wildcard patterns. An exchange uses this string to decide whether a message should be enqueued in a certain queue.
- Bindings Binding is another name for the rules by which exchanges route the messages. The rules itself are the routing keys.
- Queues Queues are message-buffers, they accumulate messages to be processed by consumers. Exchanges dispatch messages into queues. In order to receive messages from an exchange, a queue has to be bound to it.
- Consumers Consumers recieve and process messages. They get their messages from queues they are subscribed to, either by actively pulling them off the queue or receiving them automatically as soon they are enqueued. I won't cover message pulling in this blog posts.
- Messages They are what this is all about. A message consists of several parts: Header information, a set of properties and of course the message itself as string in the messages's body.
Magic sample code
If you follwed through the code in the above linked RabbitMQ tutorials, you'll see that after setting up the connection and channel objects using the "Bunny" gem there is a queue declared (named 'hello'), and a message published to it:
queue = channel.queue("hello")
queue.publish("Hello World!", routing_key: queue.name)
And on the consumer side after the same setup again all it takes to recieve and display the messages are the following lines:
queue.subscribe(block: true) do |delivery_info, properties, body|
  # ...
end
That's interesting! There are no consumers or explicit exchanges to be seen! How does this work?
What makes the first few code examples hard to grasp is that the methods defined by Bunny do a few things implicitly, and RabbitMQ has default settings which make the code above just work. To be precise:
RabbitMQ does set up a bunch of default exchanges. One of them is the nameless (empty string "") default exchange, and every queue is automatically bound to it. The default exchange will pass through all messages if their routing key is the same string as the name of the queue. So this
queue.publish("Hello World!", routing_key: queue.name)
is the same as
channel.default_echange.publish("Hello World!", routing_key: queue.name)
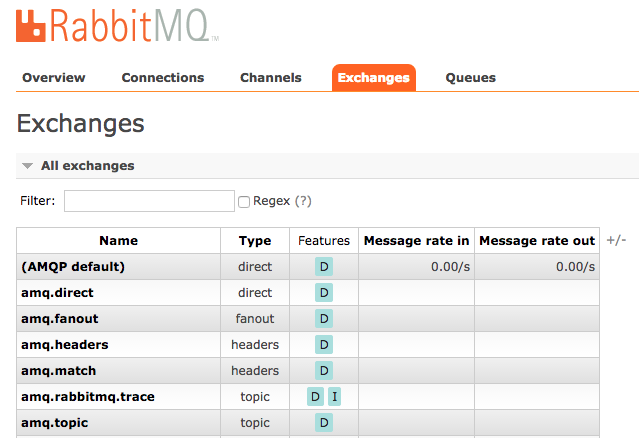
If you want to have a look at the the default exchange, you can fire up your web browser, log into the RabbitMQ managment UI and click the "Exchanges"-tab.
The next automagic thing going on in above code is that the subscribe method implicitly declares a consumer for us. Consumers handle messages inside the block with three block arguments (delivery_info, properties, body), so these are the same for the implicit consumer created with the subscribe method. If you would use an explicit consumer class, its consumer_object.on_delivery method would have the very same block arguments (more on that in the next blog post).
It's time to bring our newly gained knowledge to use.
Smoke tests with the sample apps
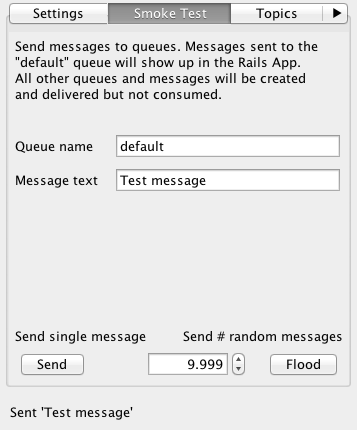
In the sample applications which "test drive" the message broker (Java GUI and Rails app) I implemented functionalities in the order as they appear in this blog post series, so the first thing would be to set up a connection to the broker on a remote machine and send it some messages. The first two tabs in the Java application reassemble just that:

Receiving messages
The Rails app is using the "Bunny" gem for connecting to the broker, and the basic setup of the app follows the one from the Bunny docs. The Bunny connections use some of the bits we've learned so far, plus some stuff regarding Unicorn's worker threads. I put all Bunny connection settings in the config/unicorn.rb file, and they vary only slightly. First things first, here are the basic connection settings for the smoke test functionality:
after_fork do |server, worker|
  # ...
  Thread.new do
    begin
      rabbitmq_connection = Bunny.new(CONN_SETTINGS)
      rabbitmq_connection.start
    rescue Bunny::TCPConnectionFailed => e
      puts "Connection failed"
    end
    begin
      rabbitmq_channel = rabbitmq_connection.create_channel
      default_queue    = rabbitmq_channel.queue("default")
      default_queue.subscribe do |delivery_info, properties, body|
        SmokeTestReceiver.new(delivery_info, properties, body)
      end
    rescue Bunny::PreconditionFailed => e
      puts "Channel-level exception! Code: #{e.channel_close.reply_code},
      message: #{e.channel_close.reply_text}".squish
    ensure
      rabbitmq_connection.create_channel.queue_delete(default_queue)
    end
  end
  # ...
end
Like in the RabbitMQ tutorials we create connection and channel objects. Like above, we declare (a.k.a create) a queue named 'default' which we want send messages to, and the subscribe method will use an implicit consumer object. To demonstrate that there can be done anything in the message-handling-block, I forward the message to a service-object-like Receiver class that justs saves the incoming message's body to the database. Saving and displaying message records is all the Rails application does.
The whole thing is run inside a Thread block, and the subscribe method is called with the standard parameter block: false. These are settings regarding Unicorn, we don't want to accidently hinder Unicorn to deliver web pages by blocking the Unicorn worker process.
More implicit behaviour of RabbitMQ/Bunny includes that without further configuration queues are not durable, which means if the broker is restarted, all queues are gone and have to be re-declared. Declaring only has an effect if the queue doesn't already exist. Queues can auto-delete, which means they are deleted as soon there aren't any consumers connected to them anymore, and queues can be exclusive which means they are only accessible from the one connection they are declared on (Bunny's default for these settings: false).
Now that we know how to set up waiting connections and queues inside an Rails app, how do messages get actually into the system?
Sending messages
Of course, the Java application that will send the messages has to do similar things as the Ruby code above, just a little bit more... wordy. A ConnectionFactory will give us a Connection instance, we call createChannel() on it, and on that channel object we can declare a queue:
// (java.lang.String queue, boolean durable, boolean exclusive,
// boolean autoDelete,
// java.util.Map<java.lang.String,java.lang.Object> arguments)
channel.queueDeclare(queueName, false, false, false, null);
This method signature should make sense by now. (Except for the arguments portion. More about that in a following blog post). As in its Ruby counterpart, we use the channel object to publish messages:
public String sendSingleSmokeTestMessage(String queueName,
        String message) throws Exception {
    // ...
    // (java.lang.String exchange, java.lang.String routingKey,
    // AMQP.BasicProperties props, byte[] body)
    channel.basicPublish("", queueName, null, message.getBytes());
    // ..
}
Again, this method signature should make sense by now (and for the BasicProperties argument: I will get into that in a later blog post). As you can see, we take the shortcut mentioned above and use the implicit nameless exchange and the queue name itself as routing key. Since we only subscribed the Rails app to the 'default' queue (and as you can see in the hints on the screenshots above), this way only messages sent to the 'default' queue will be consumed by the Rails app. Other messages will automatically declare a new queue (because the nameless exchange is used), but there are no consumers so the messages will just pile up unprocessed.
Displaying messages
One last thing. Now that we can send up to 10.000 random messages (I made up that amount just for fun to see the applications really do some lengthy work), wouldn't it be nice to have some sort of auto-updating Rails view?
Here comes a trick I learned from my workmate tilod. To get a basic "AJAXy-updating-view" for added data in the background, all you have to do is:
- Create a view partial that displays the data (like a table), and give the HTML element you want to be updated a CSS id or class like
#working-queue - Declare a route in
routes.rblikeget "ajax_progress" => "some_controlller#ajax_progress", as: "ajax_progress" - The controller action does nothing more than return
render partial: "partial_to_update"or whatever you named the partial - Now you can just use a little JavaScript in
application.jsthat polls every two seconds for new content and replaces the HTML element of the given CSS class:
setInterval(function() {
  return $.get("/ajax_progress", function(response) {
    return $("#working-queue").replaceWith(response);
  });
}, 2000)
Et voilà: A simple "live view" of mass inserted messages.
That's it for today - we covered a lot. The next blog post will deal with different kinds of exchanges and controlling how messages are dispatched into topic-queues.